【Trailhead学习】开发者2考试解锁之路:”Lightning组件框架专家”(Lightning Component Framework Specialist Superbadge)之Lightning Components Basics 。
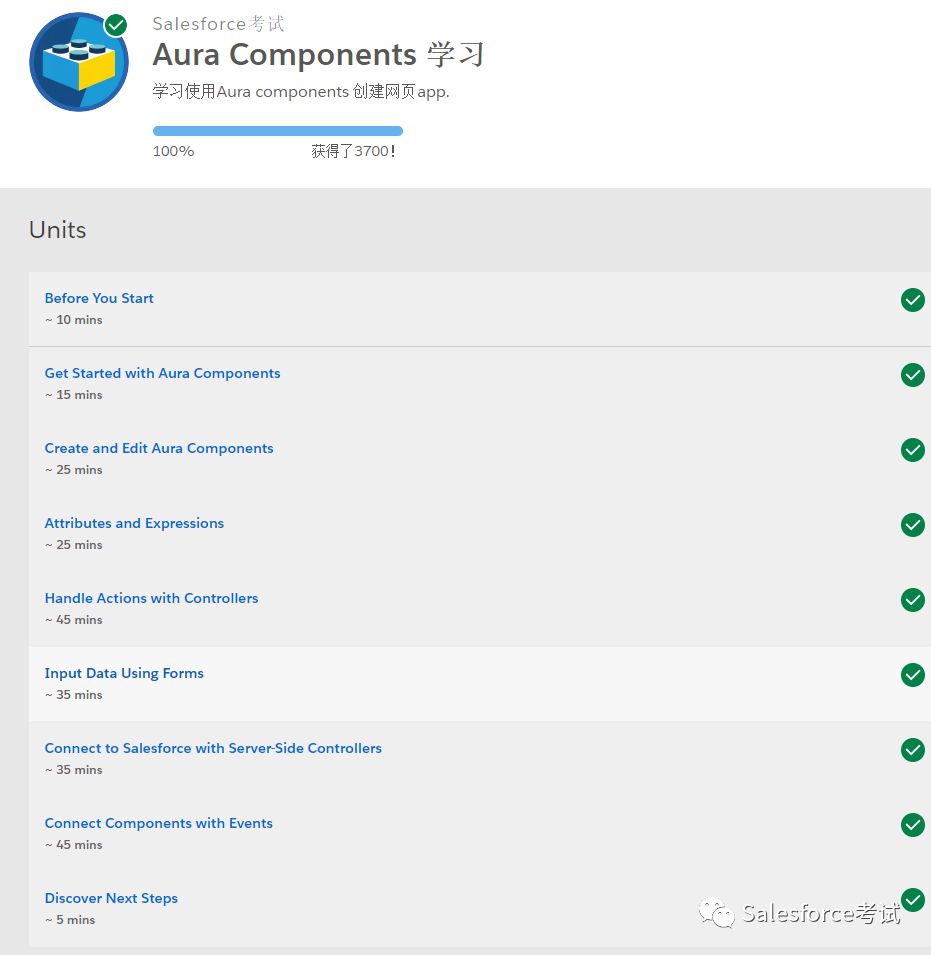
该模块为 Aura模块基础(Aura Components Basics)
https://trailhead.salesforce.com/en/content/learn/modules/lex_dev_lc_basics
分为如下几个单元:
- Before You Start
- Get Started with Lightning Components
- Create and Edit Lightning Components
- Attributes and Expressions
- Handle Actions with Controllers
- Input Data Using Forms
- Connect to Salesforce with Server-Side Controllers
- Connect Components with Events
- Discover Next Steps
该模块是解锁Lightning Component Framework Specialist Superbadge的第二个Module。其中Lightning Component Framework Specialist Superbadge的链接如下:
https://trailhead.salesforce.com/en/content/learn/superbadges/superbadge_lcf
本模块的主要学习目的是:利用Lightning Components中的可重用的组件构建网页版apps。
在开始前(Before You Start)
相关学习链接如下:
https://trailhead.salesforce.com/content/learn/modules/lex_dev_lc_basics/lex_dev_lc_basics_prereqs
学习开发Lightning components 需要学习JavaScript,对于初学者,可以参考如下链接:
JS: The Right Way: http://jstherightway.org/
题目
Setting Up Your Org
As part of our challenges for this module, you’ll build a camping list application. You need to do a few more tasks before passing this challenge and continuing.Create an Expense custom object to work with the examples. You probably already have done this.
- Create a Camping Item custom object to hold the items you need to go camping with the following fields:
- Name (use the standard name field)
- Quantity: Number(18, 0) - Required
- Price: Currency(16, 2) - Required
- Packed: Checkbox(default: unchecked)
解析
题目要求新建一个对象(Object)名字为:Expense,相关信息需要设置如下:
- Label:Expense
- Plural Label:Expenses
- Starts with vowel sound:checked
- API Name:Expense__c
同时新建四个字段在Expense对象上:
- Amount (API Name:Amount__c),字段类型:Number(16,2)
- Client (API Name:Client__c),字段类型:Text(50)
- Date (API Name:Date__c),字段类型:Date
- Reimbursed (API Name:Reimbursed__c),字段类型:Checkbox
之后需要新建另外一个对象名字为Camping Item,这里API名字可以为Camping_Item__c。同时,新建三个field:Quantity,Price,Packed。
搞定!
Get Started with Lightning Components
相关链接:https://trailhead.salesforce.com/content/learn/modules/lex_dev_lc_basics/lex_dev_lc_basics_intro
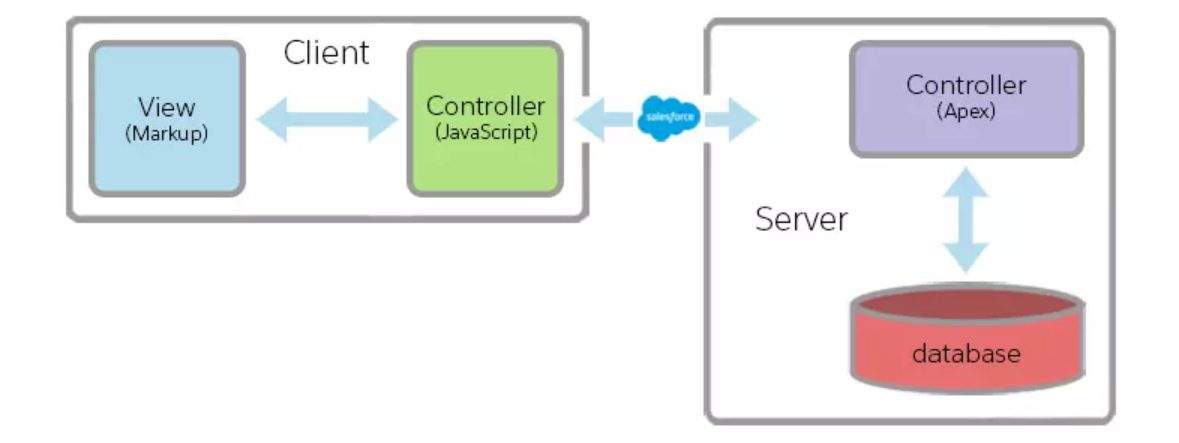
如下是Lightning Components框架,其设计师为了连接Salesforce与lightning平台。
题目一:Which of the following descriptions about the Lightning Component framework is true?
A) It’s a UI framework for developing web apps for mobile and desktop devices.
B) It uses JavaScript on the client side and Apex on the server side.
C) It’s a modern framework for building single-page applications.
D) All of the above
解析: Lightning Component适用于移动端和PC端,同时前端是JS,后端是APEX。所以答案是D
题目二:What can you build with the Lightning Component framework?
A) Standalone app
B) Components to use inside Visualforce pages
C) Drag-and-drop components for Lightning App Builder
D) All of the above
解析:本题考查Lightning Component适合应用的场景。D。
题目三:How is Lightning Components different from other web app frameworks?
A) Lightning Components is optimized for both mobile and desktop experiences and proves it with Salesforce1 and Lightning Experience.
B) Lightning Components connects natively with services provided by the Salesforce platform.
C) Lightning Components has specific opinions about how data access is performed and has specific security requirements.
D) All of the above
解析:Lightning Components 和其他框架的不同点。Lightning Components 其设计主要是为了Salesforce服务,也即连接Lightning平台和Salesforce。所以答案是D
Create and Edit Aura Components
相关链接:
https://trailhead.salesforce.com/content/learn/modules/lex_dev_lc_basics/lex_dev_lc_basics_create
题目:
Create a Simple Camping List Lightning Component
- Create a ‘camping’ component that displays a list of camping supplies that you’ll need for your trip. Compose this component by using other components to increase reusability.
- Create a campingList component that contains an ordered list of camping supplies that include Bug Spray, Bear Repellant, and Goat Food.
- Create a campingHeader component that displays Camping List wrapped in an H1 tag with a font size of 18.
要新建三个Lightning Component,分别为’camping’,’campingList’,’campingHeader’
其中’campingList’,需要列出三个列表Bug Spray, Bear Repellant, 和 Goat Food。
1 | <aura:component > |
同时新建一个’campingHeader’
1 | <aura:component > |
1 | .THIS { |
‘camping’代码如下:
1 | <aura:component > |
Attributes and Expressions
相关链接:
https://trailhead.salesforce.com/content/learn/modules/lex_dev_lc_basics/lex_dev_lc_basics_attributes_expressions
本章主要讲述的是相关属性以及表达式。
接下来是下一个题目:
Create a Packing List Item Component
Create a Lightning Component to display a single item for your packing list.
- Create a component called campingListItem.
- Add an attribute named item of type Camping_Item__c that is required.
- Display Name, Price, Quantity, Packed using an expression.
- Display Price and Quantity using the appropriate formatted number fields.
- Display Packed status using a toggle.
题目要求添加一个Camping_Item__c类型,同时定义Price和Quantity为数字字段。这里我们把Price定义为currency字段:
1 | <aura:component > |
Handle Actions with Controllers
此文主要学习如何使用Controllers
例子
下面我们来根据例子实际学习一下如何使用控制器,这里新建一个Lightning Component 命名为helloMessageInteractive:
1 | <aura:component> |
其中’c’是控制客户端的操作。通过onclick调用客户端handleClick的函数实行控制。
接下来是controller来控制按钮:
1 | ({ |
‘event.getSource()’指向的是用户所点击的按钮属性。之后通过component.set设置客户端的变量”v.message”。
最后还需要新建一个Lightning Application去预览这个组件:
1 | <aura:application extends="force:slds" > |
题目
接下来直接进入题目环节:
Mark Item as Packed
Add a button to the campingListItem component that when clicked, marks the item as packed.
- Add a button labeled Packed! that calls the packItem controller function when clicked.
- The controller function should do the following:
- Mark the item attribute as packed using a value of true
- Disable the button by marking the disabled attribute using a value of true
题目要求新建一个按钮,当按钮按下之后,设置Packed为真。
1 | <aura:component implements="force:appHostable,flexipage:availableForAllPageTypes,flexipage:availableForRecordHome,force:hasRecordId" access="global" > |
同时记得Disable这个按钮。
1 | ({ |
最后在Lightning Application去预览这个组件:
1 | <aura:application extends="force:slds"> |
最后效果图如下:
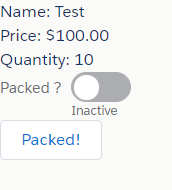
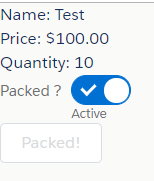
搞定!

最后,关于Lightning组件的其他库函数可以参考如下官方链接:
Components - Salesforce Lightning Component Library: https://developer.salesforce.com/docs/component-library/overview/components
Input Data Using Forms
链接如下:
https://trailhead.salesforce.com/content/learn/modules/lex_dev_lc_basics/lex_dev_lc_basics_forms
本节讲述的是如何利用Lightning组建构建表单,同时表单的样式使用Salesforce Lightning Design System,简称SLDS。
这里,我们再application里面加入 extends=”force:slds”的属性,就可以使用简称SLDS的库。
我们可以现建立一个如下的 lightning component:
1 | <aura:component> |
这里的lightning component用到了lightning:layout,同时设置了size=”6” ,那么对应道HTML里面的div会占用页面宽度的 50%,总数为12。
lightning:input是输入框里面的相关属性和HTML类似,如min是最小值。这里出现一个aura:id是在每一个tag里面的唯一的id
同时,新建一个application:
1 | <aura:application extends="force:slds"> |
效果图如下: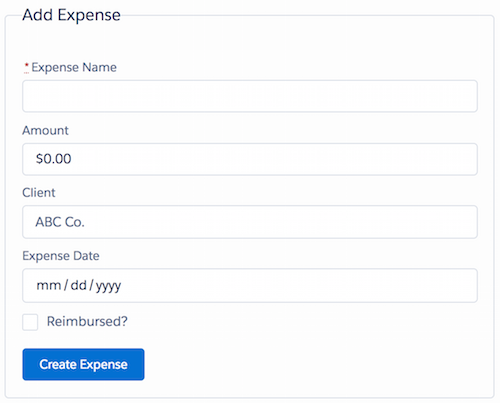
下面进入题目环节:
Create a Form to Enter New Items
In this challenge you’ll create a form to enter new items, a list to display the items entered, and add SLDS styling. First, to make our camping list look more appealing, change the campingHeader component to use lightning:layout and SLDS. Similar to the unit, style the Camping List H1 inside the slds-page-header. Add the action:goal SLDS icon using lightning:icon.
Next, modify the campingList component to contain a new item input form and an iteration of campingListItem components for displaying the items entered. Here are additional details for the modifications to the campingList component.
- Add an attribute named items with the type of an array of camping item custom objects.
- Add an attribute named newItem of type Camping_Item__c with default quantity and price values of 0.
- The component displays the Name, Quantity, Price, and Packed form fields with the appropriate input component types and values from the newItem attribute. The Quantity field accepts a number that’s at least 1.
- Submitting the form executes the action clickCreateItem in the JavaScript controller.
- If the form is valid, the JavaScript controller pushes the newItem onto the array of existing items, triggers the notification that the items value provider has changed, and resets the newItem value provider with a blank sObjectType of Camping_Item__c. For this challenge, place the code in your component’s controller, not the helper.
题目需要开发者写一个输入的表单,同时展示所有输入的记录。这里我们可以使用SLDS样式,如lightning:icon。
现在开始先写campingList 组件,也是主体部分。需要设置Camping_Item__c的quantity和price的默认值都为0。
1 | <aura:component > |
接下来需要写一个clickCreateItem函数处理当提交上来的数据,将数据传入newItem中。同时将原来的Camping_Item__c里面的值清空。这里只需要写controller就够了,helper文件就不需要了。
1 | ({ |
接下来需要写campingHeader函数,展示camping的头信息。
1 | <aura:component > |
最后的campingListItem 组件可以沿用上一章节‘Handle Actions with Controllers’里面的代码。
最后新建一个Camping.app,
1 | <aura:application extends="force:slds" > |
打开Camping.app,效果如下:
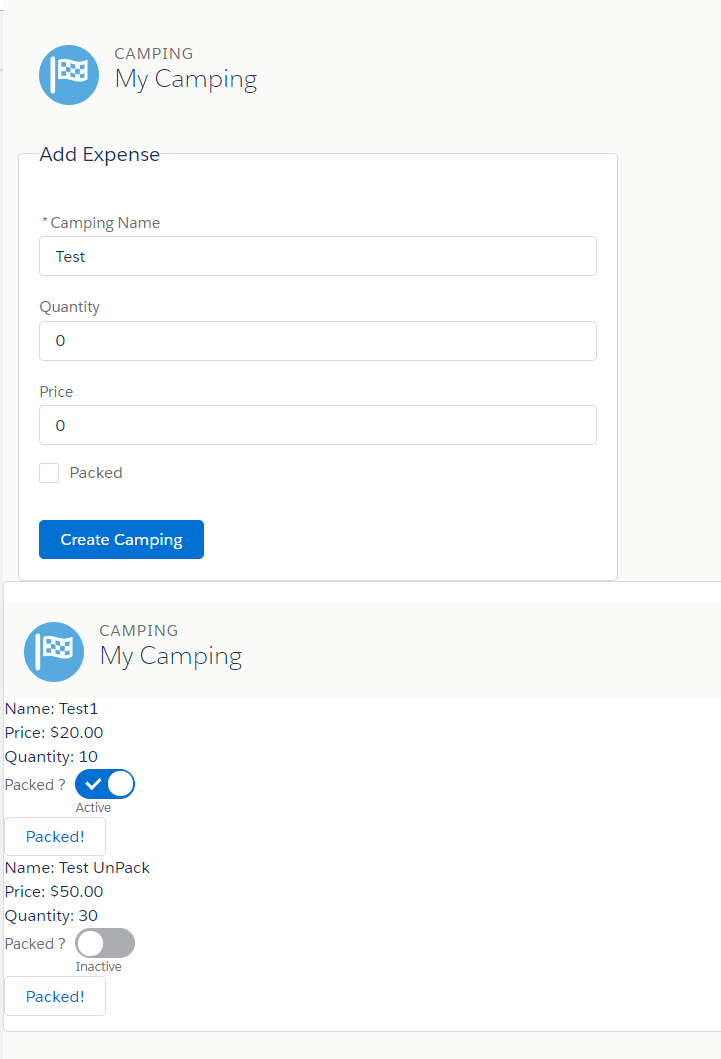
就这样,又拿了500分!
Connect to Salesforce with Server-Side Controllers
相关链接如下:
https://trailhead.salesforce.com/content/learn/modules/lex_dev_lc_basics/lex_dev_lc_basics_server
使用服务器端控制器连接到Salesforce
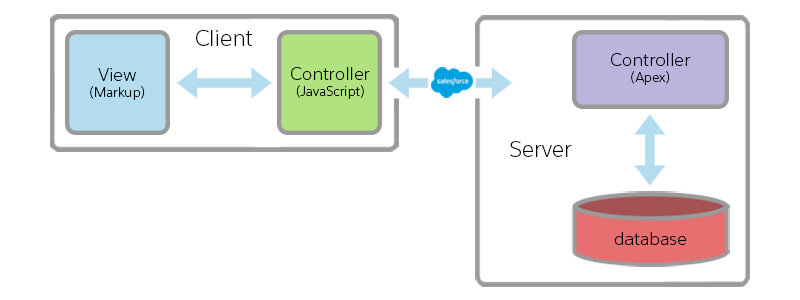
我们可以参考如下图,在前端,通过View展示给用户,并且通过JS的Controller实现与Salesforce的服务器端控制器进行连接。
在上一章节中,我们提及了利用Lightning组建构建表单,相关架构图如下,
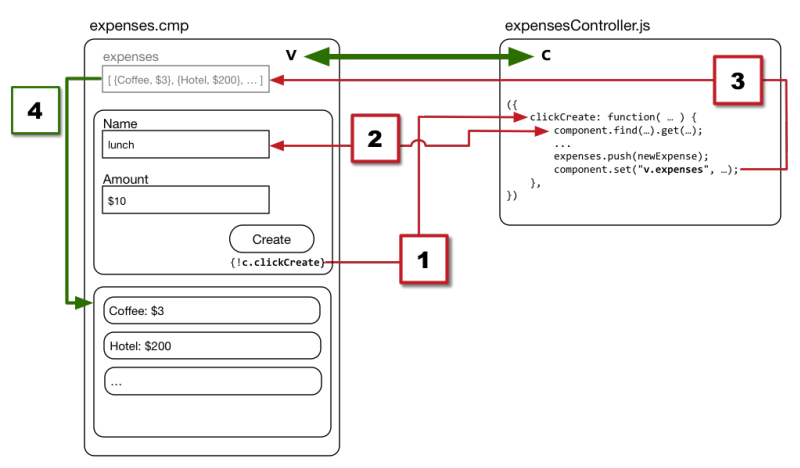
整个组建由Create按钮开始,该按钮连接到clickCreate动作处理程序。当操作处理程序运行时,它从表单字段(2)中获取值,然后将新expense添加到expense数组(3)。
当通过set更新array时,它会触发组建自动重新列出expense清单(4)。
从Salesforce查询数据
接着上面的框架图,如何实现在应用启动时加载现有数据列表(如expense)?可以参考如下代码:
1 | public with sharing class ExpensesController { |
一种更为常见的调用方法可以如下。直接通过soql传入查询语句如select id from Account实现动态查询。
1 |
|
“Aura”是Lightning Components核心的开源框架的名称。同时,该 static的关键词。所有@AuraEnabled 控制器方法必须是static方法,并且要么适用 public 要么 global范围。值得注意的另一件事是,该方法对Lightning组件的数据打包没有任何特殊作用,它只是直接返回SOQL查询结果。
从Salesforce加载数据
那么我们怎么通过Aura Components 加载相关的数据呢?
首先,我们需要在aura:component中写入相关的class,如下:
1 | <aura:component controller="ExpensesController"> |
其实,指向Apex控制器实际上并不加载任何数据,也不会调用远程方法。根据上面图示,我们还需要在js调用相关的controller方法(method)。
首先,我们需要在View层定义一开始js跑的函数。如下图所示,我们调用了js端的doInit函数。
1 | <aura:handler name="init" action="{!c.doInit}" value="{!this}"/> |
调用服务器端控制器方法
接下来我看看如何通过js调用服务器端控制器,可以通过component.get(“c.getExpenses”)定义所需要调用的方法。其中,C代表着客户端控制器。
1 | // Load expenses from Salesforce |
值得注意的是,如果是component.get(“v.something”),代表着在js在前端View层拿数据。action.setCallback(…)的代码块,它将在远程方法调用返回数据时运行。最后,通过$A.enqueueAction(action);实现完整的调用。
通过确定state为SUCCESS之后,将返回的结果由response.getReturnValue()取出。之后赋值给v.expenses。
学了了Aura基本框架之后,我们来看看如下挑战:
- 使用服务器端控制器保存和加载记录
- 使用服务器端控制器将记录保留到数据库。该campingList部件载荷现有的记录,当它启动和提交表单时保存记录到数据库中。
- 使用getItems方法和saveItem方法创建一个CampingListController Apex类。
- 添加一个doInit初始化处理程序,在组件启动时从数据库加载现有记录。
- 修改JavaScript控制器以使用帮助程序中的createItem方法从有效的表单提交中将记录保存到数据库。新项目将添加到控制器的项目值提供程序中。
首先根据需要,先需要创建一个CampingListController.cls ,同时需要写两个方法:getItems方法和saveItem方法。
可以参考如下代码:
或者如下链接:
https://gitlab.com/snippets/1807867
getItems方法是获取数据,saveItem方法是保存数据。
campingList.cmp
可以参考如下代码:
或者如下链接:
https://gitlab.com/snippets/1807867
CampingListController.js
然后在前端加载一个doInit初始化处理程序:
可以参考如下代码:
或者如下链接:
https://gitlab.com/snippets/1807868
在组件启动时从数据库调用getItems获得现有记录
同时需要写保存数据的方法,可以参考CampingListHelper.js
可以参考如下代码:
或者如下链接:
https://gitlab.com/snippets/1807869
Connect Components with Events
相关链接如下:https://trailhead.salesforce.com/content/learn/modules/lex_dev_lc_basics/lex_dev_lc_basics_events
接下来我们学习如何在component中使用event。下面这个例子展示了如何通过component发送event:
1 | <lightning:input type="toggle" |
这里使用了lightning:input这个标签,同时定义了类型为type=”toggle”,也就是开关类型。
当用户点击了这个开关,会触发clickReimbursed事件,下面是clickReimbursed事件,会新建一个event名字为updateExpense。同时传入expense 参数。
1 | ({ |
接下来定义一个event,其中event有两种类型,组件和应用程序类型。这里我们使用的是组件事件,名字为expensesItemUpdate。
1 | <aura:event type="COMPONENT"> |
那么如何发送一个event呢?这里我们需要注册一个event,加上如下代码在expenseItem 组件中。如下代码的意思是埋在本组件里面会触发一个event,名字是updateExpense,其类型为c:expensesItemUpdate。
1 | <aura:registerEvent name="updateExpense" type="c:expensesItemUpdate"/> |
发送了event之后,该如何在主component里面处理呢?
如下代码展示了在主组件expenses中,添加一个aura:handler,接收来自expensesItemUpdate的event,同时会触发一个新的函数handleUpdateExpense。
1 | <aura:handler name="updateExpense" event="c:expensesItemUpdate" |
接下来我们看看handleUpdateExpense如何拿到相关event传过来的参数,直接使用event.getParam(“expense”)获取参数,传给helper函数进行相关处理。
1 | handleUpdateExpense: function(component, event, helper) { |
最后,updateExpense 的方法可以如下。
1 | updateExpense: function(component, expense) { |
学习了event如何操作之后,我们来查看相关挑战:
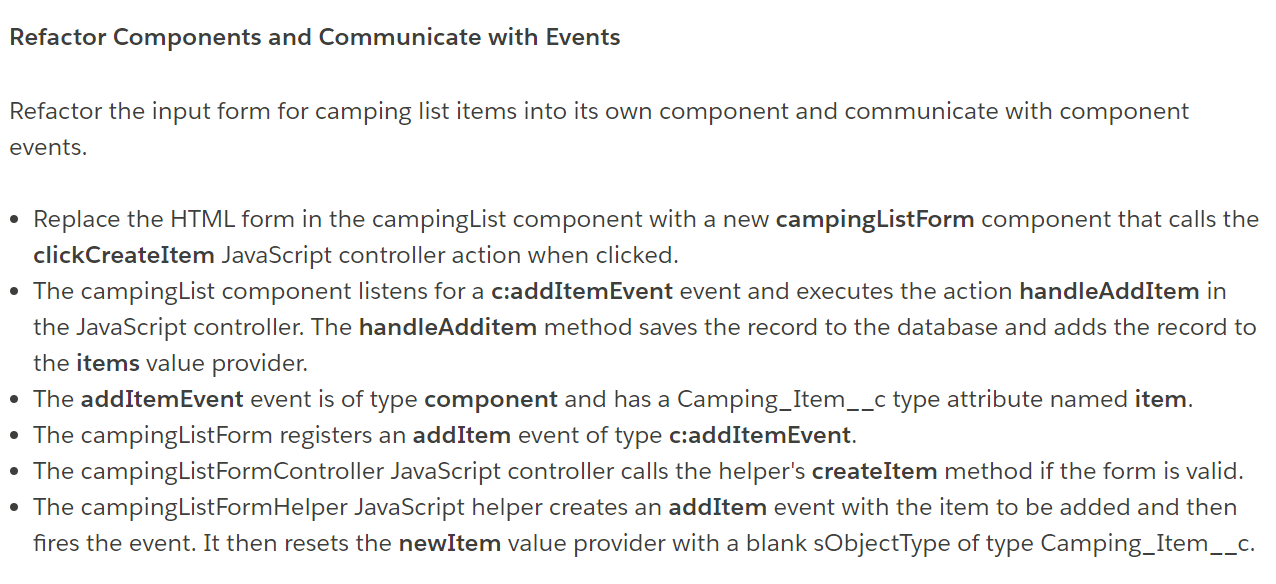
Refactor Components and Communicate with Events
Refactor the input form for camping list items into its own component and communicate with component events.
Replace the HTML form in the campingList component with a new campingListForm component that calls the clickCreateItem JavaScript controller action when clicked.
The campingList component listens for a c:addItemEvent event and executes the action handleAddItem in the JavaScript controller. The handleAdditem method saves the record to the database and adds the record to the items value provider.
The addItemEvent event is of type component and has a Camping_Item__c type attribute named item.
The campingListForm registers an addItem event of type c:addItemEvent.
The campingListFormController JavaScript controller calls the helper’s createItem method if the form is valid.
The campingListFormHelper JavaScript helper creates an addItem event with the item to be added and then fires the event. It then resets the newItem value provider with a blank sObjectType of type Camping_Item__c.
使用新的campingListForm组件替换campingList组件中的HTML表单,该组件在单击时调用clickCreateItem JavaScript控制器操作。
campingList组件侦听c:addItemEvent事件并在JavaScript控制器中执行操作handleAddItem。该handleAdditem方法保存记录到数据库中并添加记录到的物品价值提供商。
该addItemEvent事件类型的成分和有一个名为Camping_Item__c类型属性的项目。
campingListForm注册了一个类型为c的addItem事件:addItemEvent。
如果表单有效,campingListFormController JavaScript控制器将调用帮助程序的createItem方法。
campingListFormHelper JavaScript帮助程序使用要添加的项创建addItem事件,然后触发事件。然后,它使用类型为Camping_Item__c的空白sObjectType 重置newItem值提供程序。
相关代码如下:
addItemEvent.evt
1 | <aura:event type="APPLICATION" description="Event template" > |
在主组件里面campingList.cmp,这里需要引用<c:campingListForm />,同时添加aura:handler接收来自campingListForm的event,同时触发handleAddItem函数处理。
1 | <aura:component controller="CampingListController" |
这里附上campingListController.js代码:
1 | ({ |
在campingListForm.cmp中,我们注册一个Event,名字为addItem
1 | <aura:component implements="force:appHostable,flexipage:availableForAllPageTypes,flexipage:availableForRecordHome,force:hasRecordId" access="global" > |
当按钮lightning:button按下时候,触发clickCreateItem函数,在campingListFormController.js里面,同时会调用helper.createItem。
1 | ({ |
当campingListFormHelper.js中,触发event时候,会调用名字为addItem的注册event。
1 | ({ |
Discover Next Steps
相关题目:
- What does SLDS stand for?
A) Salesforce Leadership Does Surf
B) System Limits Detection System
C) Salesforce Lightning Design System
D) sObject Loading Data System
答案:去官网看看https://www.lightningdesignsystem.com/,所以答案是B
- What are Lightning Events used for?
A) Salesforce mini developer conferences
B) Communicating between loosely coupled components
C) Logging critical details during app runtime
D) Scheduling sales calls in Lightning Experience
答案:Lightning Events主要用于连接component。所以答案是B
相关参考文献: Events | Lightning Aura Components Developer Guide | Salesforce Developers: https://developer.salesforce.com/docs/atlas.en-us.lightning.meta/lightning/intro_events.htm
- What is the name of the open-source framework that Lightning Components is based on?
A) Aura
B) Angular
C) jQuery
D) WebObjects
答案:本文所有内容都是围绕Aura而展开的。所以答案是A。
- In which language do you write Lightning Components action handlers?
A) Java
B) Visualforce
C) JavaScript
D) Objective-C
答案:Lightning Components action 主要是用JavaScript写的,所以答案是C。
就这样我们成功拿下Lightning Components Basics整个模块:
参考文献:
- Lightning Apps Developer Center: https://developer.salesforce.com/developer-centers/lightning-apps/